
- Backendless and Corona: Using API for Adding Users
- Backendless and Corona: Retrieving user data
This post will go over the basics of integrating Backendless services into the Corona framework…
First, create your Backendless account and obtain the “application-id” and “secret key”. Keep those handy, you’ll be using them throughout these tutorials.
At present, there is not a proper, Corona-specific API plugin so we’ll be using the REST API for Backendless. A handy link can be found here for the REST documentation.
Managing users in the Backendless
I originally was excited about Backendless for user management. I was excited at the prospect of NOT having to “roll my own”. I was pleased to see that they provided a great and simple, yet flexible user management system. Let’s not waste any time, let’s cover the basics here first and then, let’s REALLY play with the easily customization aspects!
|
1 2 3 4 5 6 7 8 9 10 11 12 13 14 15 16 17 18 19 20 21 22 23 24 25 26 27 28 29 30 31 32 33 34 35 36 37 38 39 40 41 42 43 44 |
json = require ("json") -- Create a table to hold our headers we'll be passing to -- backendless. This is how Backendless local headers = {} headers["application-id"] = "ENTER YOUR INFO HERE" headers["secret-key"] = "ENTER YOUR INFO HERE" headers["Content-Type"] = "application/json" headers["application-type"] = "REST" -- This is a "yes" press -- OK, well write to the file and update it with the user's name -- Create a table to put our data into local tempTable = {} -- Populate our table with some data...you'll need to change the usernames -- if you plan on testing it multiple times, of course. Check on your backendless -- dashboard and find the user table: tempTable.username = "fowler" tempTable.email = "amyfarrahfowler@bigbangtheory.com" tempTable.password = "whooooo" -- Encode the table into the expectes JSON... local jsonData = json.encode(tempTable) -- Debug output for your console window... print("JSON is "..jsonData) -- Event handler for our network.request webcall local function RetrieveUserData( event ) if ( event.isError ) then myText.text = "Network error!" else print("Response "..event.response) local response = json.decode(event.response) print("Total users "..response.totalObjects) end end -- Now, we'll combine both our headers and the body into the single table "params" -- and send this off to Backendless! local params = {} params.headers = headers params.body = jsonData -- To create a user using the JSON encoded info we defined above in the 'params' table network.request( "https://api.backendless.com/v1/users/register", "POST", RetrieveUserData, params) |
If you replace headers[“application-id”] and headers[“secret-key”] with your own data, and run the above code, it should create a new user with the above info. Here’s what the console should come back with something similar to this:
|
1 2 3 4 5 |
JSON is {"username":"fowler","password":"whooooo","email":"amyfarrahfowler@bigba ngtheory.com"} Response {"username":"fowler","updated":null,"created":"06/10/2014 22:57:14 GMT+ 0000","email":"amyfarrahfowler@bigbangtheory.com","ownerId":null,"objectId":"BC9 F50E0-6D6B-AC54-FFAD-8B30BAE50C00"} |
Yours will differ of course with the unique GUID assigned to your “objectId” and the date/time.
Now, go to your backendless dashboard, and select the data icon and select “users” and you should see the user info listed there. Refresh if it doesn’t appear right away:
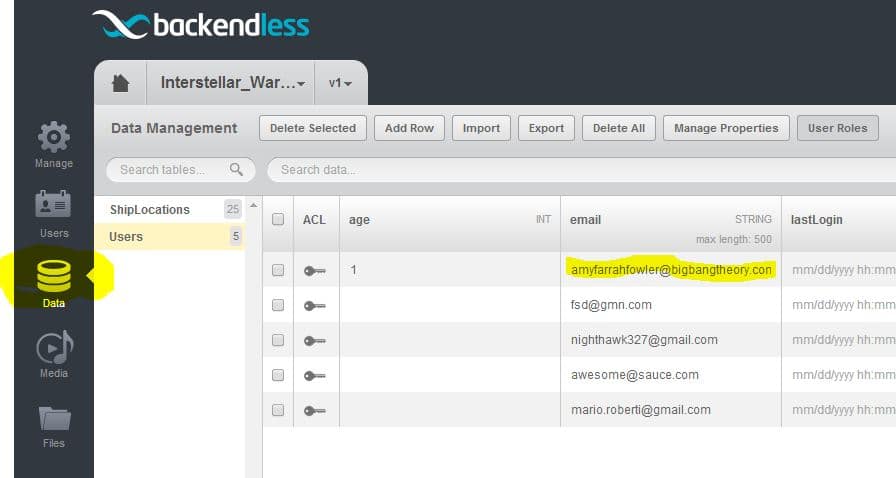
It’s that simple. You’ve just created a user programatically using Backendless!